Custom LED Lens vs Diffuser: How to Choose
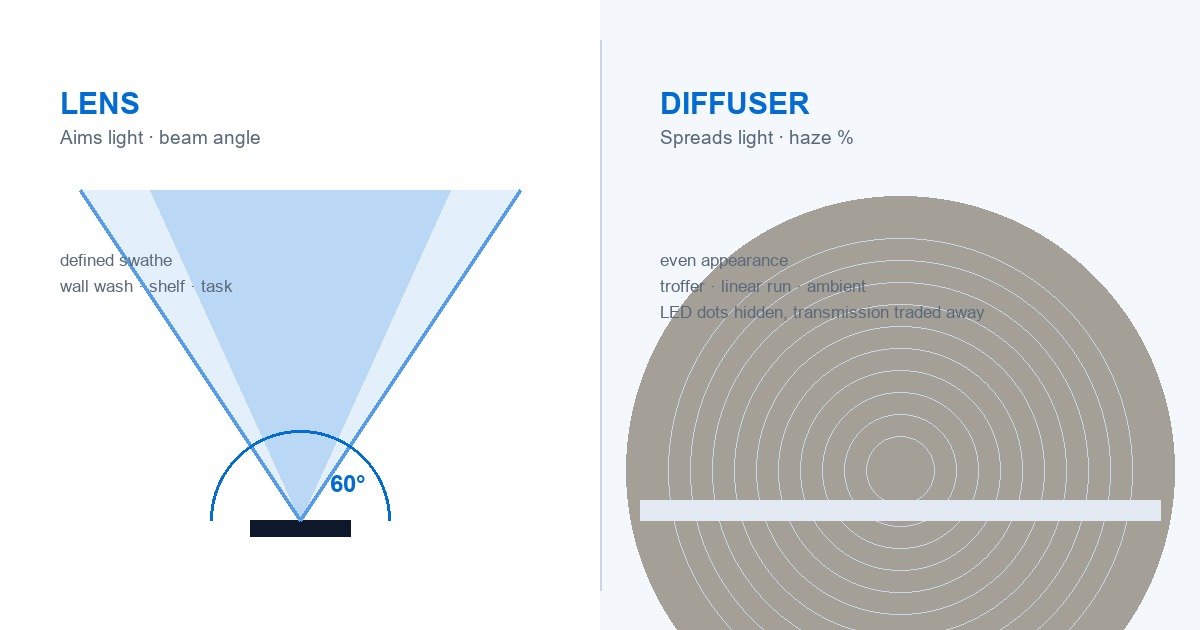
Abstract: Both parts sit between the LED and the room, and both are called “the cover” in more RFQs than they should be. They do different jobs. A lens refracts or reflects light into a defined beam, and its controlling number is beam angle. A diffuser scatters light to hide the LED array, and its controlling number is haze, which is bought with transmission. Picking the wrong one shows up as a fixture that either throws a hard pattern on the ceiling or glows evenly and delivers less light than the datasheet promised. This article separates the two, explains LED pitch and stand-off, and sets out when stacking both is justified and when it is waste.
The confusion is understandable. Both are extruded or moulded in PMMA or PC, both snap onto the same housing, and a lot of fixtures use both at once. But the specification questions are different, and mixing them up produces a drawing nobody can quote accurately.
What each part actually does
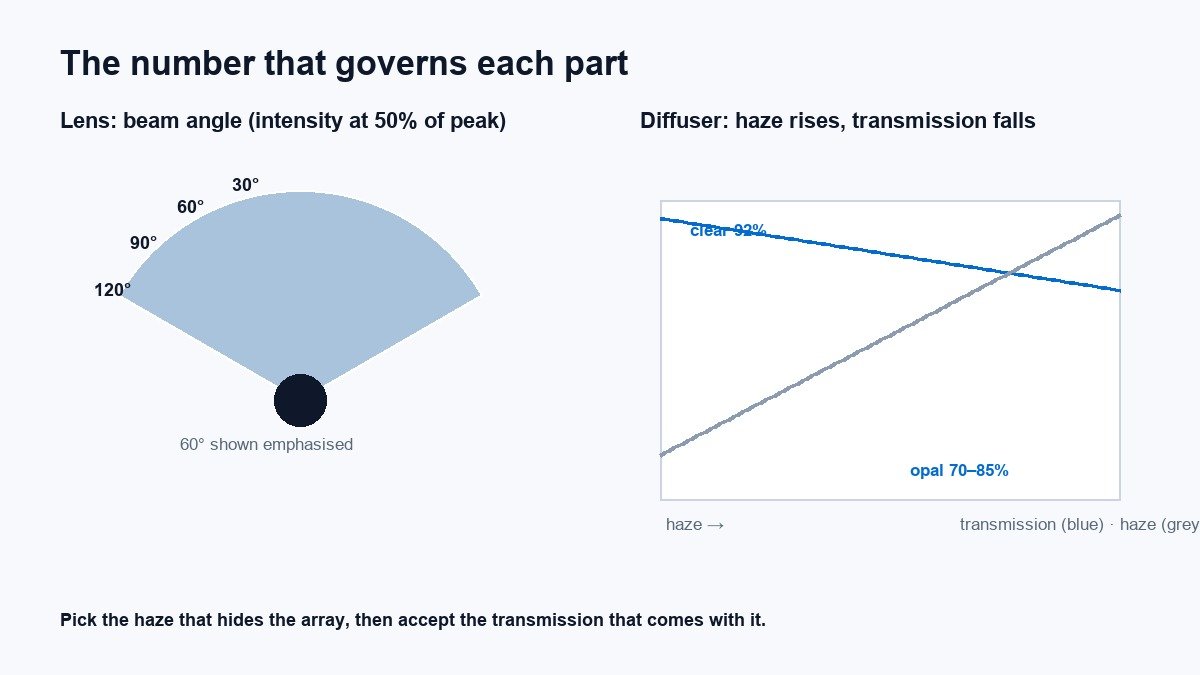
A lens is a beam-shaping element. Light enters, is refracted at the surfaces (or reflected internally in a TIR design), and leaves in a controlled angular distribution. The number that defines it is the beam angle: 30°, 60°, 90°, 120°, usually quoted as the angle where intensity falls to half the peak. A 60° linear lens over a strip puts most of the light in a defined swathe, which is what you want for wall washing, shelf lighting and task lighting.
A diffuser is a uniformity element. It does not aim light, it scrambles it. Haze is the number that defines it: the share of transmitted light scattered beyond a small angle off the direct beam. High haze hides the individual LED dots and softens the edges of the beam, and it is paid for in transmission, because scattering centres that send light sideways also send some of it backwards.
That trade is the whole story. A diffuser that hides a dense LED array completely might transmit 70 to 85% depending on thickness and loading. A clear lens might transmit 90% and leave every dot visible at close range.
The numbers that decide it
| Lens | Diffuser | |
|---|---|---|
| Job | Put light where it is wanted | Make light even and hide the source |
| Controlling spec | Beam angle, optical efficiency | Haze %, transmission %, diffusion angle |
| Typical material | PMMA or PC, clear, sometimes silicone for high temperature | PMMA or PC, opal or prismatic |
| Failure when wrong | Hard edges, scalloped ceiling pattern, dark zones between fixtures | Visible LED dots, or a fixture that misses its lumen target |
| Tolerance sensitivity | High: wall thickness and surface geometry set the beam | Moderate: thickness consistency drives evenness |
| Typical use | Wall washers, shelf and cove lighting, task lighting, signage | Troffers, linear runs, general ambient, anything seen directly |
A prismatic diffuser sits between the two: micro-prisms on the surface redirect light by refraction, so it controls direction somewhat while still scattering. They are the usual answer when you need glare control and even appearance at the same time. Our prismatic diffusers are built for that, and linear diffuser profiles cover the plain scattering case.
LED pitch and stand-off: the variable that decides dot visibility
Dot visibility is not a property of the diffuser alone. It is a relationship between three numbers: the LED pitch on the board, the distance from LED to diffuser (stand-off), and the haze of the diffuser.
Move the diffuser closer to the LEDs and the dots get sharper. Space the LEDs wider apart and they get sharper. Increase haze and they soften, at the cost of transmission.
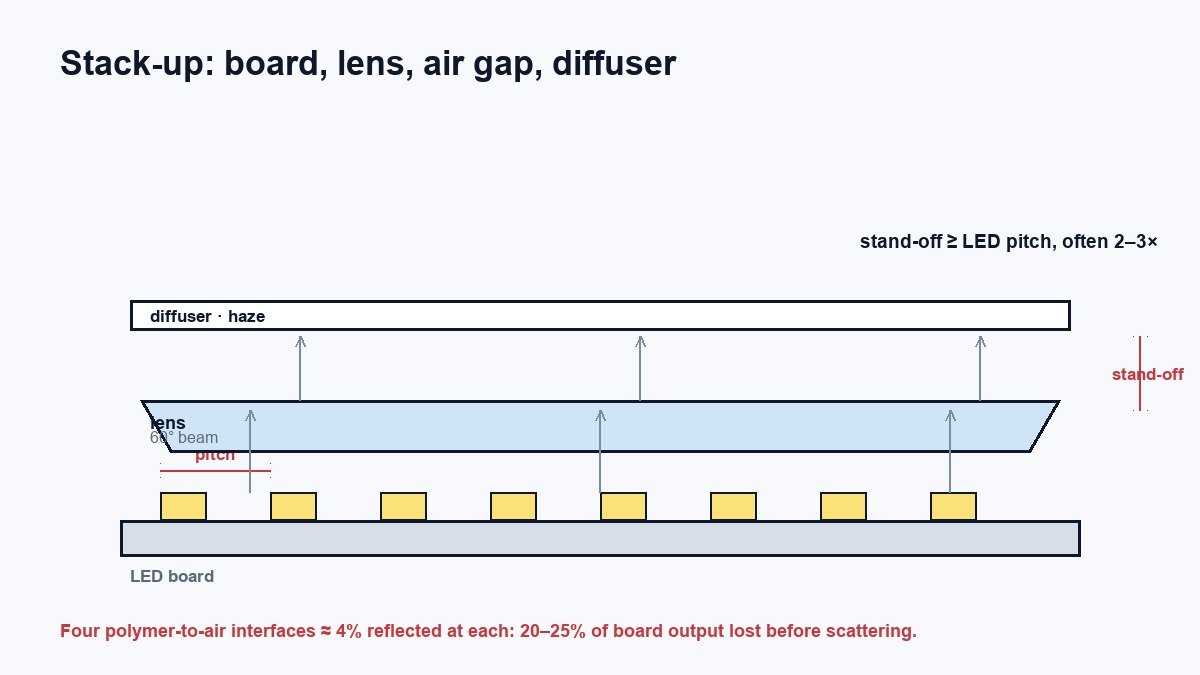
As a starting point for a linear run, put the stand-off at least equal to the LED pitch, and more often two to three times it, then choose the lowest haze that still hides the array at the intended viewing distance. That order matters: people usually pick the diffuser first, discover the dots are visible, and then jump to a heavier diffuser that costs 10% of the output. Raising the profile height costs less light and is often the better fix.
This interacts directly with glare. A diffuser that spreads light into the 60 to 90° zone raises the Unified Glare Rating for anyone working under it, which is the mechanism behind higher transmittance producing worse glare. If the fixture sits over desks, UGR governs the choice more than appearance does.
When you need both, and what it costs
A lens over the LED and a diffuser over the lens is a common and legitimate stack: the lens collects and aims, the diffuser cleans up the appearance. It is also where light goes missing.
Every polymer-to-air interface reflects roughly 4% of the light crossing it. A lens has two surfaces, a diffuser has two more, and the air gap between them adds reflections in both directions. Add absorption in the diffuser itself and it is realistic to lose 20 to 25% of the board’s output through a four-surface stack, before any scattering loss.
Two ways to reduce that: specify an optical grade PMMA (around 92% transmission) or PC (around 88 to 90%) rather than a general-purpose grade, and ask whether one part can do the job. A prismatic diffuser with the right prism geometry frequently replaces a lens-plus-diffuser stack at higher system efficiency, and it is one assembly step instead of two.
Where the environment is hot or impact matters, PC wins on toughness and PMMA wins on long-term colour stability. The comparison is set out in PC vs PMMA for LED light covers, and the ageing side, that a yellowed cover loses transmission and turns into a service call, is covered in why LED diffusers turn yellow.
How to specify it in an RFQ
Six facts produce a quote that does not need three rounds of clarification:
- LED type and pitch, plus board width. The optical design starts from the source, not the room.
- Target beam angle or target UGR, not both. If you give a beam angle, we design to it. If you give a UGR limit for a defined room geometry, we design to that instead, and the two can conflict.
- Mounting height and the surface being lit. A 60° beam at 2.5 m and at 6 m are different products.
- Material and any rating required. PC where impact or temperature demands it, PMMA for optical clarity and colour stability, and any flame or IP requirement that constrains the choice (see IP65 vs IP66 vs IP67).
- Length and how it is cut. Optical parts have a direction, and cut length tolerance affects end appearance. The bands worth calling out are set out in LED profile extrusion tolerance.
- Quantity and whether tooling is open or new. A lens usually needs a tool; a diffuser profile may already exist in a near size. See why the same lighting cover quote varies by 30% for how tooling amortisation shows up in unit price.
Three specification mistakes worth avoiding
- “Opal diffuser, maximum transmission.” Those pull in opposite directions. Pick the haze that hides the array, then accept the transmission that comes with it, or change the stand-off.
- Copying a beam angle from a competitor’s datasheet. Beam angle is measured under defined conditions and two suppliers measuring differently will report different angles for the same optic. Ask for the intensity distribution, not just the headline number.
- Specifying the optic before the board. If the LED pitch changes after the lens is tooled, the beam pattern changes with it, and the tool is already paid for.
Where this leaves the drawing
Decide what the fixture has to do to the light before choosing the part. Aim it, spread it, or both, and if both, say which one governs. Then give the source data, the mounting height, and the acceptance criterion, beam angle or UGR, and let the optical design follow from there.
We supply 60° linear LED lenses, custom LED lenses tooled to your distribution, and the diffuser profiles that sit over them. Send the board layout and target beam, and we will tell you whether one part does the job. Browse the full optical range or request a quote with your drawing attached.